How To Use Your Screen Printing Machine

Adjustable Squeegee Down Limit
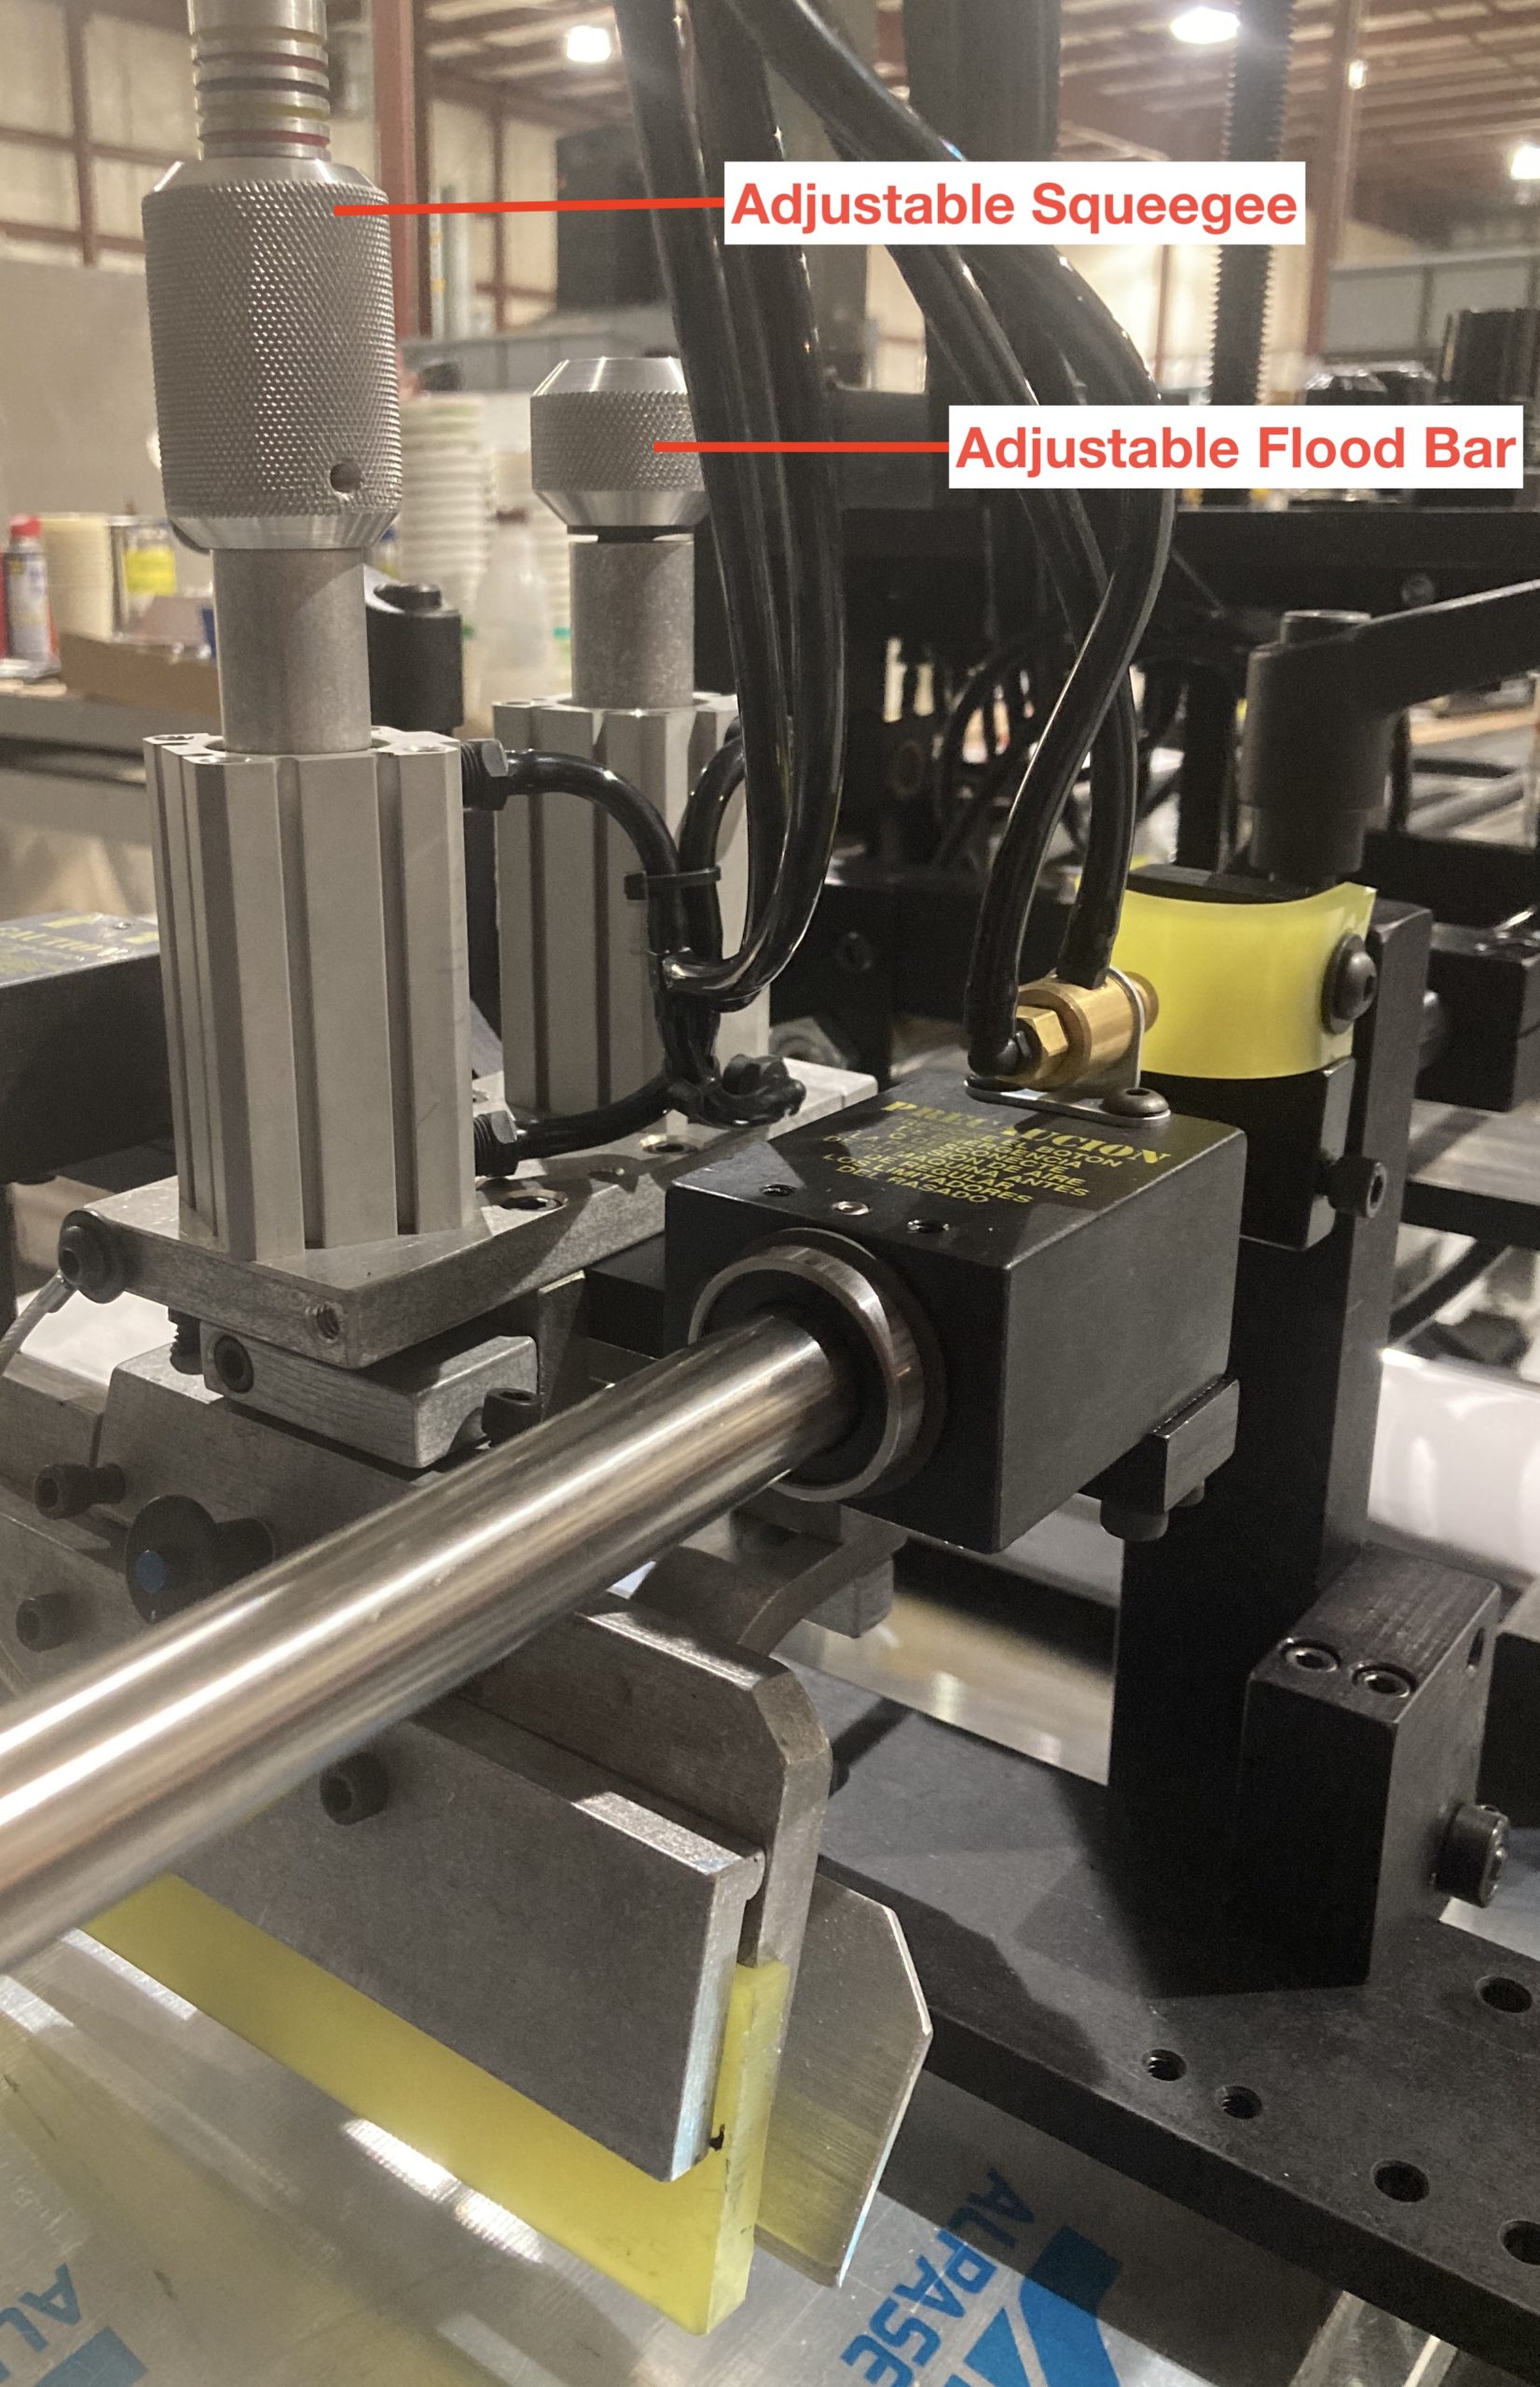
The adjustable squeegee down limit adjust knob is the mechanical stop that establishes how far the squeegee travels downward against the screen substrate In almost all situations for printing on flat (or cylindrical) substrates, it is recommended that the adjust knob be allowed to “bottom out” (make contact with the rubber washer below it) during the print stroke. The resiliency of the squeegee rubber will compensate for any slight variations in the substrate thickness or flatness.
Your machine may be equipped with an optional adjustable squeegee pressure gauge and regulator. If so, you can use this feature on substrates, which are irregular in shape, such as, slightly concave or convex surfaces. To use this feature, the squeegee down limit stop must be adjusted so that the squeegee cylinder is free to allow full travel down to the lowest part of the substrate. As the squeegee travels along the part being printed during the print stroke, the squeegee will be able to rise up and drop back down progressively during the print stroke. The squeegee adjustment must be set to a minimum pressure to obtain a good print throughout the print stroke. This feature lets the squeegee holder rise and fall rather than forcing the squeegee to deflect. A deflecting squeegee will change the squeegee angle of attack and force it against the screen and substrate. Both of these factors will compromise print quality.


Adjustable Squeegee Up Stop Limit
This adjustment serves three purposes.
a) It acts as a stop limiting the “up” travel of the squeegee. As a rule, the squeegee should rise approximately 1/8” (3 mm) off of the screen when it is retracted.
b) It acts as an anti-rotation device to prevent the squeegee from rotating the squeegee cylinder during operation.
c) The up stop limit can be set to allow the squeegee to be tilted. This will change the “skew” or “snowplow” angle of the squeegee. This is sometimes desirable to compensate for ink working its way to one side of the screen, or to obtain better print definition by not letting the squeegee run parallel to the screen fabric mesh. However, the accepted practice in the industry is to angle the screen mesh approximately 15 degrees on the screen frame when making the screen.
Squeegee Attachment Bar
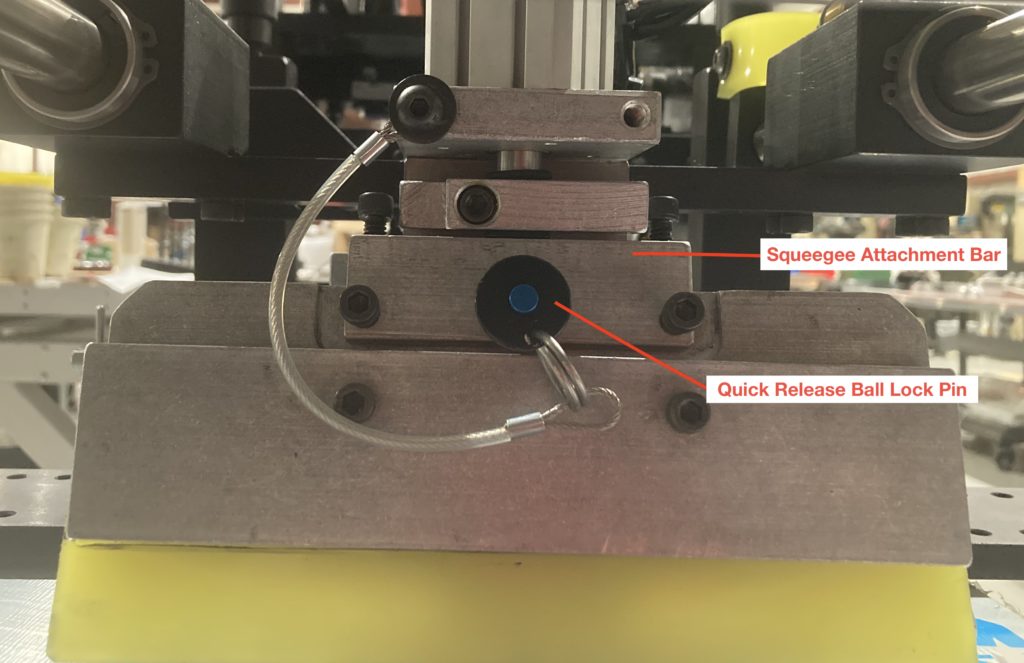
The squeegee bar attachment is available in different angles. The standard squeegee attachment bar to substrate angle is 15 degrees from vertical. This 15 degree holder is installed as standard on every new printer unless otherwise specified. 15 degrees from vertical is an ideal angle for printing on most every flat substrate.
Quick Release Ball Lock Pin
The squeegee quick release pin allows you to remove the squeegee in seconds without any tools. In order for the pin to be removed easily, the squeegee tilt screws must not be forcing the squeegee against the release pin. Always adjust the squeegee tilt screws to allow some free tilting movement of the squeegee so the release pin will be free to slide out and in. The screen should be pivoted down away from the squeegee when the squeegee is removed.
Squeegee Tilt Screws
The squeegee tilt screws are on either end of the squeegee attachment bar. In many printing situations, the squeegee should be allowed to “float” from side to side. This is achieved by retracting the two tilt screws so they do not extend into the slotted portion of the holder where the squeegee holder is captured. However, if you need more squeegee force against the substrate on one side or the other, these screws will allow you to bear down on the squeegee and force it to apply more pressure on either side of the release pin. When making this adjustment, keep in mind that it is not necessary to prevent the squeegee from “rocking” on the pull pin altogether. It is required that you back off on the opposing tilt screw so that it does not bind the release pin and make it impossible to pull the release pin out.
Flood Bar Mount Screws
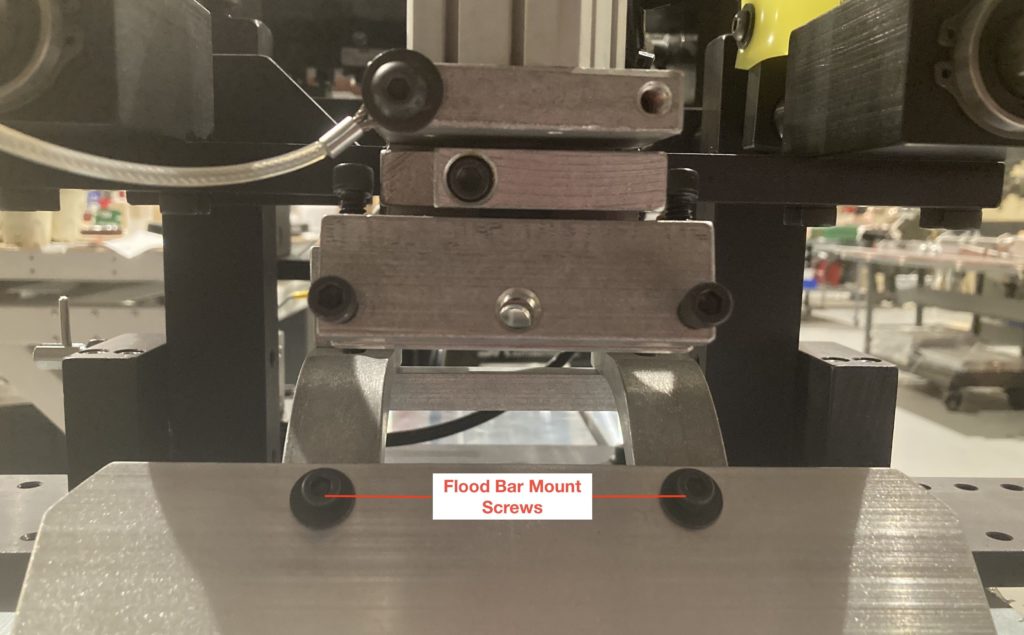
The flood bar mount screws are found at the ends of the angle flood bar holder. These mount screws hold the flood bar to its holder. These screws must be removed when changing flood bar sizes. When installing a flood bar it must be parallel to the screen. To adjust the flood bar parallel to the screen:
a) Install the flood bar and leave the flood bar mount screws loose.
b) Install a screen frame with fabric. The frame should be flat on the bottom with no tape or glue to prevent it from sitting flat in the screen frame holders.
c) Place a thin piece of cardboard or plastic between the flood bar edge and the screen fabric while hand tightening the screws. Use no wrench at this point. Assure that the flood bar down limit is contacting the rubber washer when performing this set up. If the flood bar is not at its down limit, you may rip the screen when the machine cycles at power-up. Remove the cardboard or plastic spacer and view (from behind the print head) the distance or parallelism of the flood bar to the screen. You will see a slit of light if viewed from behind the print head. If it is not parallel, use a plastic object such as a screwdriver handle to gently tap the top of the flood bar into parallelism.
Use the wrenches provided with your machine to tighten the flood bar mounting screws. The flood bar might not be free to move because the holes in the flood bar are bottomed out against the flood bar mount screws. If this is the case, you must adjust the flood bar down limit knob so the flood bar mount screws are approximately in the center of the holes in the flood bar before hand tightening the screws.
Once the flood bar is set, check that the flood bar is parallel to the screen during the entire print stroke by viewing the distance or by touch. Gently push up the screen against the flood bar and feel the consistency of the spacing.
Adjustable Flood Bar Down Limit
The flood bar down limit knob is used to adjust the flood bar to be close to, but never touch the screen. Please read Flood Bar Mount Screws above for important information about this adjustment.
The Dual Head option (which is standard on the F1-DH series machine) is generally used for squeegee widths over 16” (406 mm). Although our customers have successfully printed using 24” (609 mm) wide squeegees on the single head machines, the Dual Head arrangement offers much more control and ease, accommodates 3/8” x 2” (9.5 mm x 50 mm) squeegee rubber, and offers precision squeegee pressure equalization on either end of the squeegee.
Certain applications may require more space between the squeegee and flood bar. With this dual head configuration, it is possible to change the distance between the flood bar and the squeegee by repositioning the brackets which hold the flood bar to the mounting plate.
Squeegee Pressure
Machines are fitted with regulators to permit an adjustment to squeegee pressure. This device is identical in appearance to the stroke (main) regulator and directly affects the force applied by the squeegee cylinder. Pressure settings are shown on the gauge directly above this regulator (30 psi is the normal setting). It should be stated here that the term “force applied by the cylinder” should not be confused with the actual distance traveled by any cylinder, as the squeegee cylinder incorporated an adjustable physical stop and will not travel beyond this regardless of the pressure setting. (This is true of all cylinders on this machine). It is therefore necessary to consider both of these factors when determining the total amount of force applied to the substrate.
Off Contact
The gap between the table and the bottom of the screen can be adjusted to obtain the desired off contact or snap-off distance. To adjust, loosen the two locking levers on the rear of the printer. Turning the hand wheel at the top of this assembly will increase or decrease the off contact clearance within a range of 6” (152 mm) from the table surface. Lock both levers when the desired clearance is obtained. Raise the front carriage post by loosening the lock lever on the side of its holder and turn the hand wheel upward to meet the carriage rest block. It should lift up on the carriage slightly. This post helps to remove the full weight and vibration on the carriage from the overhead cylinder, but to a greater degree is used to level the screen to the table in front/rear condition of parallelism.
The screen frame holders are set at the factory to be level with the table in the left to right condition of parallelism. If slight tilting of the screen out of this parallelism is desired for a special purpose, it can be achieved by tightening only on of the locking levers on the vertical press frame and then further turning the hand wheel to tilt the entire carriage slightly. This procedure actually forces the hinging assembly out of alignment with its guides and, therefore, should not be used to tilt the screen more than a slight amount.
When printing with screen frame smaller than the top surface of your vacuum table or printing bed, optional screen frame clamping methods can be provided. These methods or attachments include specially designed screen frames or parts, which will attach to your screen frame. This will permit close contact between the bottom of the screen and the top of the vacuum table or printing bed without interference of the screen frame holder.